Configuring Unifi APs (UAP-AC-M and UAP-AC-M-PRO)
This guide will walk you through configuring a Ubiquiti Access Point AC Mesh ("bunny ears"), which consists of the following steps:
- Power and factory reset the Unifi AP AC Mesh
- Connect the device to your computer, and make sure it has a route to the Internet
- Identify AP's IP address and SSH to connect to the device:
ssh ubnt@192.168.1.20 - Inform the device of the URL of our Unifi controller:
sudo set-inform http://unifi.phillycommunitywireless.org:8080/inform - Adopt the device via the controller interface
- Configure the device and Update the device's firmware
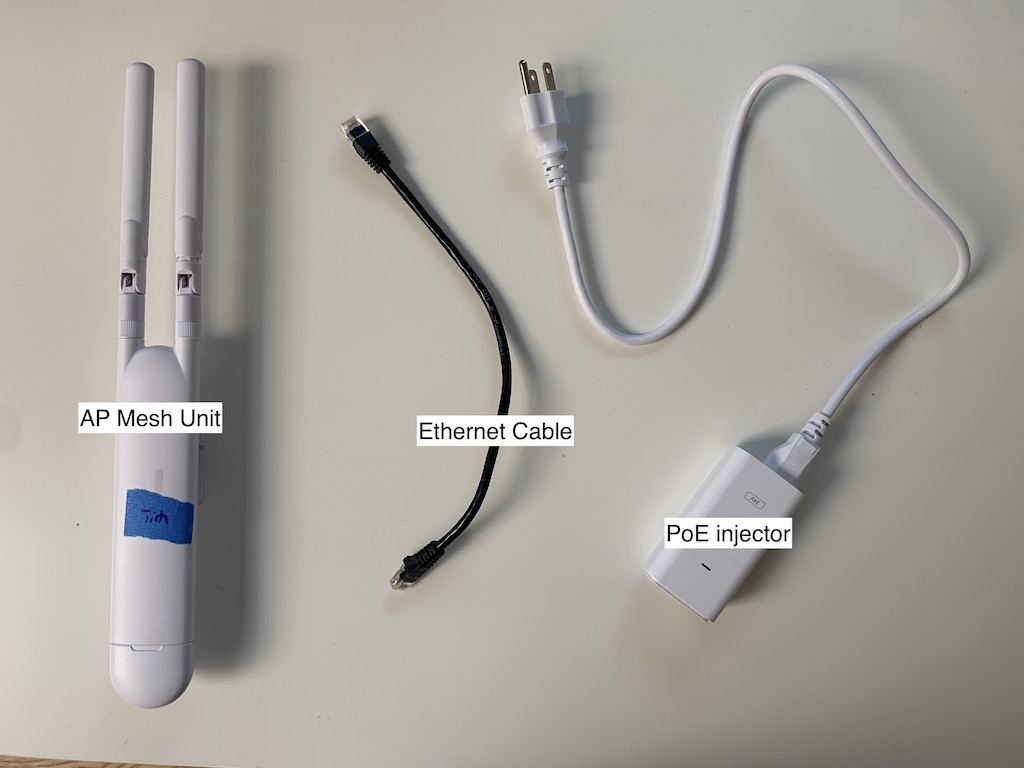
You will need
| Item | Purpose |
|---|---|
| Unifi Access Point | Unit to be configured |
| Power-over-Ethernet injector (comes with AP) | Supplies power to the AP |
| 2 Ethernet cables | One powers AP, one provides data link to computer |
| USB Ethernet adapter | If your computer doesn't have an Ethernet port |
| Computer running MacOS or Linux | Perform remote configuration |
| Wall outlet | |
| Paperclip (or other thin item) | Performing a factory reset |
Setup Steps
1. Power the device and Factory Reset
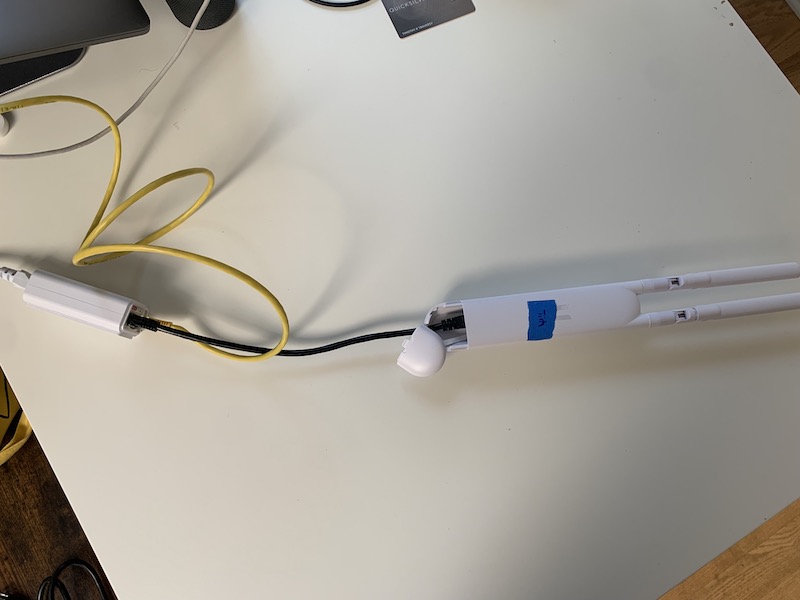
- Plug the PoE injector into an outlet, or power strip.
- Connect the
POEport of the injector to the AP Mesh Unit with an ethernet cable. You should see a white light turn on.
The light will be blue if the device has an existing configuration. Don't worry, we'll factory reset the device next.


The AP Mesh Units have had unexpected behavior even out of the box, so it is recommended to factory reset it before continuing.
- With the paperclip, press the reset button at the bottom of the AP Mesh Unit in until it clicks.
- Hold it pressed in for 5 seconds.
- The status light on the AP should flash, then go out as the device reboots. When it comes back on it should be solid white, indicating the reset was successful.
- For more info on the status lights, refer to this article: LED Color Patterns for UniFi Devices
Note: The AP Mesh Unit can take a few minutes to boot after being plugged in or reset, so wait until the status light is solid white,.
2. Connect the AP to your computer
We need to connect the device to our computer and determine its IP address, while also making sure it also has a route to the Internet. The Unifi mesh aps should automatically reset to 192.168.1.20 so you can first try Step 2 and see if the ssh command works.
If the mesh AP's IP address isn't 192.168.1.20, there are two ways to find the IP address: a) connect to local router b) connect to your computer. We usually do option b) connect the AP directly to our computer.
2a) If you have physical access to your WiFi router
- Plug the
LANport of the PoE injector directly into an Ethernet port on your router. - The AP will get the IP address
192.168.1.20from your router. Skip to the SSH step.
2b) If you don't have access to your router
- Connect the
LANport of the injector to your computer, using the USB Ethernet adapter if you don't have an Ethernet port. - Make sure your computer is connected to WiFi.
- Your computer's IP address must be Static in order for you t see and SSH into the AP.
- Follow the instructions here: Setting a static IP for your computer to set your IP address.
- You can also follow the directions on Sharing a WiFi connection over Ethernet to share your computer's wireless connection with the AP.
- To find the AP's ip address, or if the SSH hangs, try running
arp -ato find the AP.
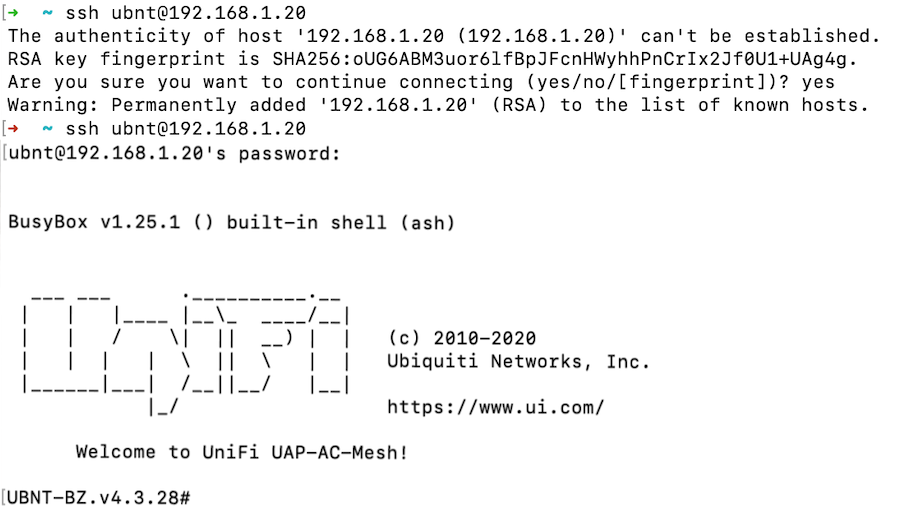
3. Connect to the AP using SSH
- At the terminal, run the command
ssh ubnt@192.168.1.20or replace the default IP address with the one you copied. - You may see "
The authenticity of host [...] can't be established". Type "yes" and press Enter. - When prompted for the password, enter
ubnt. - You should now be connected to the AP Mesh Unit.
If you you get a Host key verification failed error, you'll need to edit your known_hosts file.
1. The easiest way is to run the following command (at least on Ubuntu this works): sudo ssh-keygen -f "/root/.ssh/known_hosts" -R "192.168.1.20"
1. Alternatively, ppen ~/.ssh/known_hosts with vim, nano, or the text editor of your choice.
2. Remove the line beginning with 192.168.1.20 (It will look something like 192.168.1.20 ssh-rsa AAAAB3NzaC1yc2E...), and save the file.
4. Adopt AP Mesh Unit
You will need access to the PCW Unifi controller interface to complete this step.
- From your
sshshell, run the commandsudo set-inform http://unifi.phillycommunitywireless.org:8080/inform. This will send a message over the internet to our controller, letting it know the device wants to be adopted.
If your prompt hangs here, your AP probably doesn't have a route to the internet. Return to the connection step and make sure your setup follows those instructions.
- Open the Unifi controller Hostifi portal in your browser, and navigate to the device list. The AP should appear in the list of devices awaiting adoption.
- Press
Adoptto adopt the AP Mesh Unit. - Adoption can take a while. Try refreshing the Hostifi portal and/or browser.
- You will be prompted to choose a Group for the AP. Choose All AP's and press save.
- Go back to the main Dashboard to see if the device has been adopted.
- If the device hangs during adopt, try to Forget it. Try the
set informcommand again.
5. Configure the AP and set the firmware version
We use device firmware version 4.3.20, on the advice of the good people at NYCMesh.
- Change the settings to add your name and a number for each device you configure. The admin team will relabel devices upon install.
- To upgrade firmware from within the controller, go to the device and open the Settings. Under Manage, find the Location URL field, and paste the link for the firmware version (
https://dl.ui.com/unifi/firmware/U7PG2/4.3.20.11298/BZ.qca956x.v4.3.20.11298.200704.1347.bin), then press Update. We use device firmware version 4.3.20, on the advice of the good people at NYCMesh.
Further configurations of the device can be adjusted in the settings, but it is better to leave radio settings as default until installed on the network.
You can also set the firmware version while you are connected to the device through SSH:
- While connected to the device via SSH, type
upgrade https://dl.ui.com/unifi/firmware/U7PG2/4.3.20.11298/BZ.qca956x.v4.3.20.11298.200704.1347.bin - You will be disconnected from the device. Wait until it reboots and the light is solid white (you can
pingthe IP address to test if it's up, or just try SSHing), then SSH back in. - If it hangs, try canceling out and re-running the command
- You can verify the firmware upgrade by looking at the header to your command line input, which provides the firmware version like "UBNT-BZ.v4.3.20#".
The firmware upgrade tends to hang. We recommend upgrading firmware through the Unifi controller.